-
Created by
 Rob Ables, last updated on Feb 17, 2023
15 minute read
Rob Ables, last updated on Feb 17, 2023
15 minute read
How To Access This Page In IWS
Main Menu → Department Admin → Document Type
Last Updated v9.1.0
Document Type Administration
This section of the Department Admin area allows authorized administrators of the specified department to create new document types for their department. A document type is defined as a categorization of a specific image, file, form, or document that will be captured, routed and stored in the IWS system. For example: a Legal department may wish to bring their "Vendor Contracts" into IWS to route through a specified set of workflow queues to be processed and then ultimately stored in IWS for archive and future retrieval. The "Vendor Contracts" is the Document Type in this example. In the Document Type admin area, we will tell the IWS system how to classify, index, and route the "Vendor Contracts" each time one is brought into the system. We will also be able to set security for what users and groups in the department can access the document type.
There are multiple versions of Document Types that can be setup in IWS for different purposes. These are called "Form Types" and are defined in the Document Type section below.
Document Type Search/List
Use the list to find and edit an existing document type. Use the Add Doc Type button to create a new document type for the department.
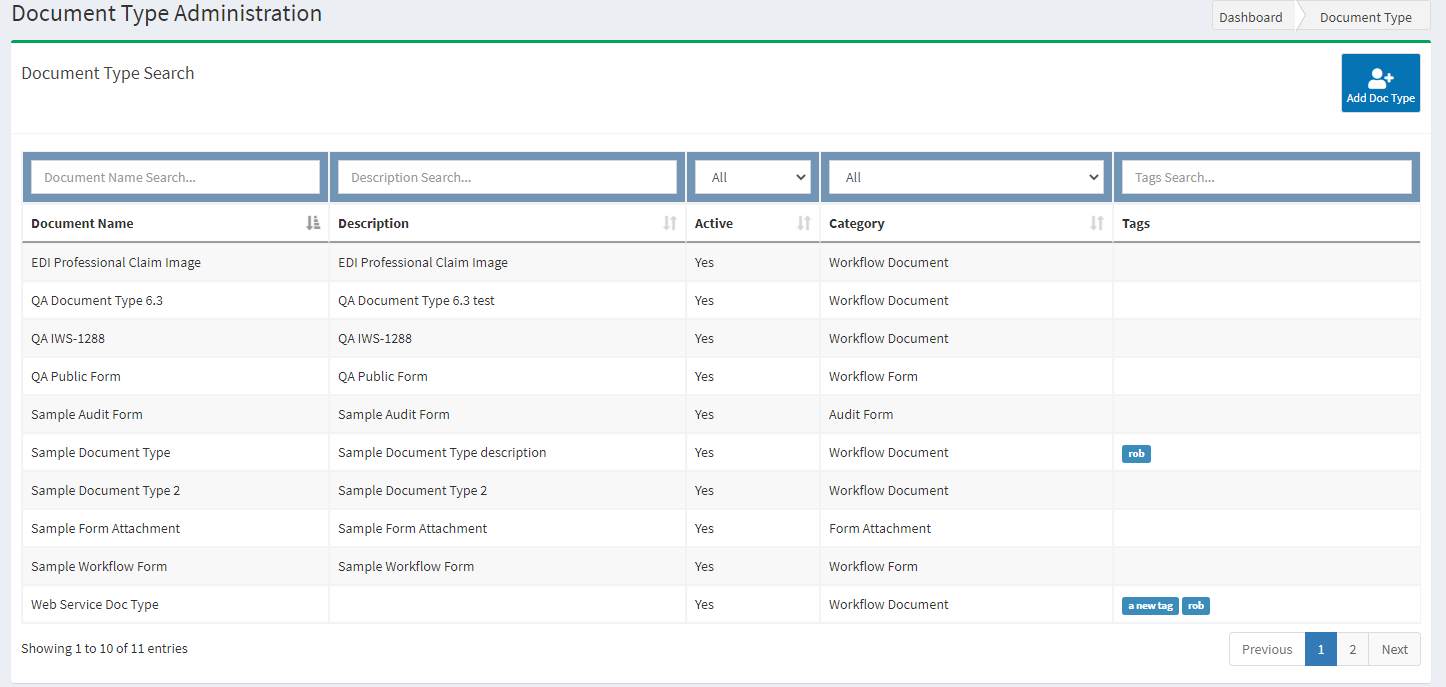
- Use the search/filter boxes at the top of the grid to narrow the list of Document Types.
- The column headers can be clicked to sort each column. Click again to sort the opposite direction.
- Tags that are added on each document type can be used to filter the grid to document types that match the specified tag.
- Click on any Document Type record to open the edit screen.
Document Type (Tab)
In this first tab of the Document Type admin area, we can define all of the default settings for the Document Type.
**Options shown in the screen shot below are examples and can change depending on the parameters selected during document type setup.
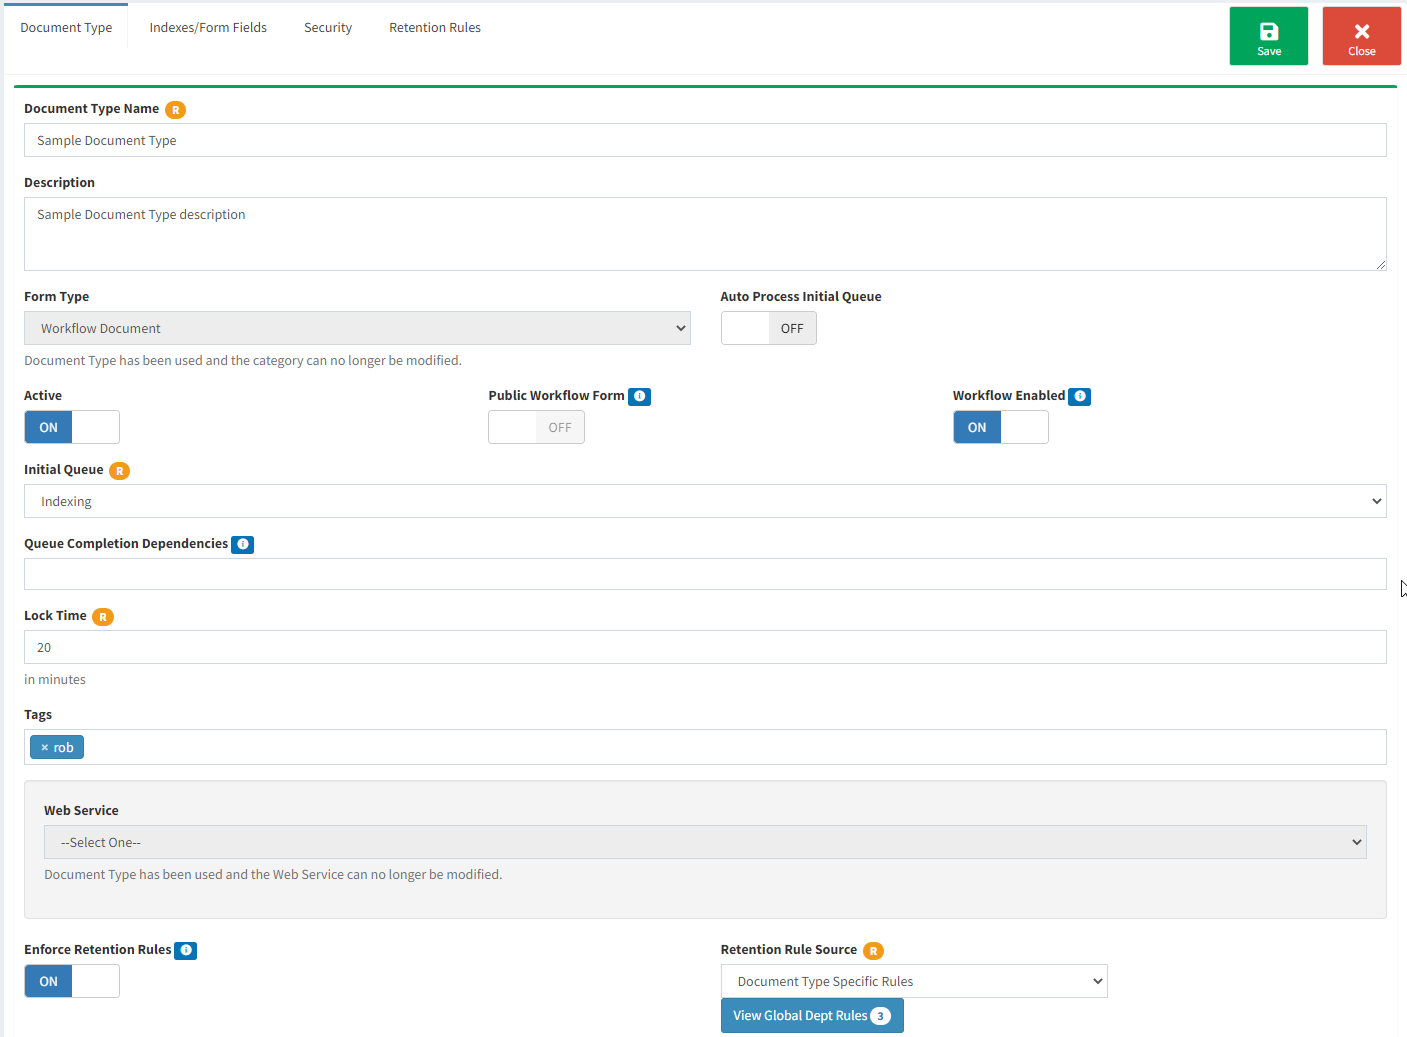
Action Buttons
- Delete: If the document type has not been used in workflow yet, you can delete this record.
- Save: Saves any changes you have made to the document type record.
- Close: Closes the record (without saving changes) and returns to the document type list.
Fields and Settings
- Document Type Name: The name of this document type that will display throughout the IWS system.
- Description: Enter a description of what this document type is used for in the IWS system. This data is only viewable on this screen.
- Form Type: Select the type of form this document will be. The definitions of each are below:
- Audit Form: Used for the IWS auditing module. If you need to create a form to use in the auditing process, this is the option to select.
- Form Attachment: This form type can be used to create online forms that can be filled out and attached to an EXISTING primary document as it goes through workflow. Only select this option for that special scenario.
- Workflow Document: This is the primary form type used in IWS and is the standard to select for a regular document type that will be scanned, emailed to uploaded into the IWS system for workflow.
- Workflow Form: Selecting this form type will allow you to create a custom online form using the Index/Form Fields tab. This Workflow Form will be the primary document going through workflow once it has been filled out by a user on the My IWS - New Workflow Task screen. This document type will flow through workflow just like the Workflow Document form type does. The only difference is this is an online form that is filled out inside of IWS rather than a scanned, emailed or uploaded document. This document type is also automatically indexed based on the form fields that are filled out during form entry. Therefore, the Initial Queue selected for this type of form should not be an indexing queue. Instead, it should route to a standard queue for processing or have workflow disabled if it is only being entered for storage. Please be sure to setup any queue rules on the queue you route these to if you want automated workflow.
- Auto Process Initial Queue: This option is only available for Workflow Form and Workflow Document document types. If this option is selected, the system will automatically complete the workflow form through the "Initial Queue" selected on this screen and process any rules that apply to this document type.
- This can be used to help move a workflow form through the Indexing queue automatically, but still have it process the rules in the indexing queue to help route the workflow form based on index values entered on the form itself (since workflow forms do not need to be indexed manually.)
- This can also be used for departments that want to split their Indexing functions out by teams using the initial Import Source. An initial queue can be setup with rules to route the documents to specific team indexing queues based on the import source. In that scenario, the document type(s) to be indexed via the team indexing queues would be set to Auto-Process Initial queue using those Import Source based rules to drive them through that initial routing queue to the correct indexing queue.
- Active: Is this document type currently active in the system?
- An inactive document type cannot be selected to bring new documents into the system.
- You must assign at least one index field or index set, and one user to access the document type before it can be activated.
- Public Workflow Form: This option is only available for Workflow Form document types. If this option is selected, the workflow form can be shared with and completed by users that do not have direct login access to IWS.
- Department admins can create workflow forms to capture information and start a workflow process by an outside user.
- Public Form ID and URL (link): To have an outside user complete this form and submit to the IWS workflow, provide the listed URL to them. As long as the document type is active in this admin screen, the form can be accessed via that link without any login credentials.
- Click the clipboard icon to copy the URL/Link to the form.
- **IWS is only accessible inside the HealthSmart network. "Outside user" refers to other HealthSmart staff that may not have an IWS login. Only the form itself is accessible to the outside user. No other areas of IWS can be accessed.
- Workflow Enabled: Is this document type enabled for workflow beyond initial Indexing?
- ON: This document type will process through standard workflow queues assigned to it.
- Off: This document type will move to storage only after initial indexing (it will only be available through the search areas).
- Initial Queue: What is the first queue in workflow that you want this document type delivered to?
- **This is almost always an Indexing queue as that is the first thing that should happen to documents when they enter the system.
- After the initial queue, queue rules setup on the indexing queue will route the documents. If no queue rules are present that match the document, the workflow user can route the document manually.
- Queue Completion Dependencies: What queues in your department do you want the system to guarantee this document type completes before exiting workflow?
- Any queues selected here will be required before a workflow user can remove the document from workflow (the last step in the process).
- This option does NOT route the documents to these queues. It just checks at the time of removal from workflow to make sure any required queues were completed at some point in the workflow process.
- The indexing queue cannot be selected here as it is already the initial queue.
- Lock Time: Specifies the amount of time (in minutes) a workflow processor is allowed to have a document open for this document type. While the document is locked, no other workflow processors can access the document in the queue. IWS implements a "Soft Lock" setting which allows the system to give the document back after the time limit is reached. This will account for any documents that have not been properly closed by a workflow processor. Keep in mind how much time it should take to process the workflow document for this document type when modifying this setting.
- Tags: Custom defined tags can be added to help find this document type via the document type search grid in the department admin area.
- Web Service: Options appearing in this selection will differ for every IWS installation and department. This selection will contain a list of legacy systems which IWS can share data with. This stops the duplication of indexing information on a document when the data is accessible in another system. See your system administrator for information regarding each selection which may appear in this box. After a document exists in the system filed under this document type, this field can no longer be modified.
- Enforce Retention Rules: Turn on document retention rules for this document type.
- On: Enforce rules for this document type.
- Off: Do NOT enforce rules for this document type.
- See the section below in this article labeled "Retention Rules" for more detailed information.
- Retention Rule Source: If enforcement is turned on, what retention rule source will apply?
- Document Type Specific Rules: Only the rules setup under this document type's Retention Rules tab will be enforced.
- See the section below in this article labeled "Retention Rules" for more detailed information.
- Global Department Rules: Retention rules setup at the department level will be enforced. No custom rules for this document type are needed.
- IWS System Administrators can setup department level retention rules. Please work with your IWS System Administrator to define rules that you can apply to some/all of your document types.
- View Global Dept Rules: Click this option to show the available department level rules for reference. A new window will open to display the rules.
- These rules are read-only from this view. Only an IWS system administrator can modify department level retention rules.
- Document Type Specific Rules: Only the rules setup under this document type's Retention Rules tab will be enforced.
Indexes/Form Fields (Tab)
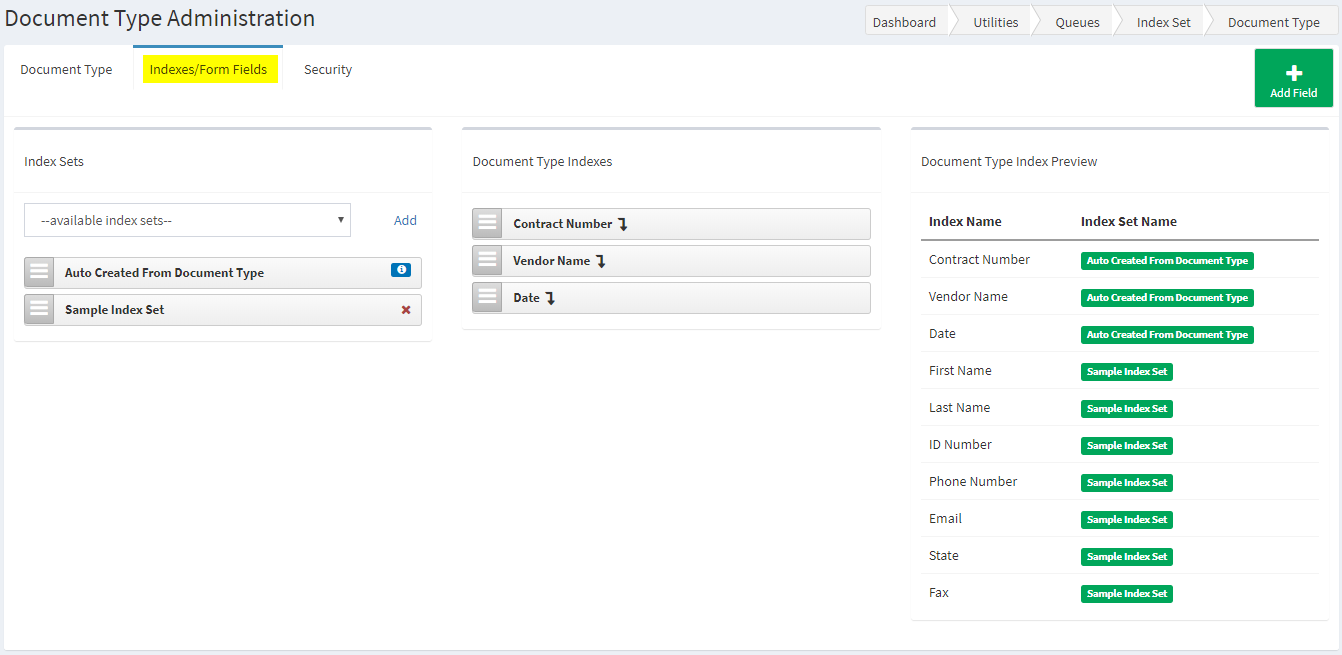
In the second tab of the Document Type admin area, we can define the index or form fields that will be captured/displayed when this document type is used.
Depending on the FORM TYPE selected on the document type tab, the fields entered here will be used for indexing purposes only, or for form data entry and indexing purposes.
Fields and Settings
Index Sets
Index sets are not required, but can be used for ease of use across multiple document types that share similar index information.
- List Selection (drop down): Select the Index Set(s) to be attached to this document type (optional). Click the "Add" link next to the list to add the selected index set to the document type.
- Multiple index sets can be selected and will be listed in the order they were chosen.
- Ordering can be changed by click, hold, and dragging the icon on the left of the index set name
 .
. - The order the index sets are displayed here will change the order in the Document Type Index Preview section (far right column) and the order in which they will be displayed to the user at the time of indexing or form data entry.
- Ordering can be changed by click, hold, and dragging the icon on the left of the index set name
- Multiple index sets can be selected and will be listed in the order they were chosen.
Document Type Indexes (Form Fields)
Document Type Indexed/Form Fields will only apply to this document type. Any existing stand alone index/form fields will be listed in this column.
- Use the Add Field button (as described in the Action Buttons section to add a new index/form field to this document type.
- Ordering can be changed by click, hold, and dragging the icon on the left of the index/field name .
- The order the index sets are displayed here will change the order in the Document Type Index Preview section (far right section) and the order in which they will be displayed to the user at the time of indexing or form data entry.
- The down arrow icon indicates that the "Start New Row" option is selected for that field
 .
.
Document Type Index Preview
This section displays a list of all combined Index Set and Document Type Indexes selected on this document type. The fields will display in the order of how the indexes/fields will appear to the end user and as ordered as described in the sections above.
Action Buttons
- Add Field: Add a new custom index/form field to this document type.

- Fields added on this screen only apply to this specific document type and will appear under the center column labeled Document Type Indexes. To use common index fields across document types, use the Index Sets screen under Department Admin. Index Sets can be defined independently of specific document types and can then be attached to multiple document types in the system to create common index fields to search across all related document types.
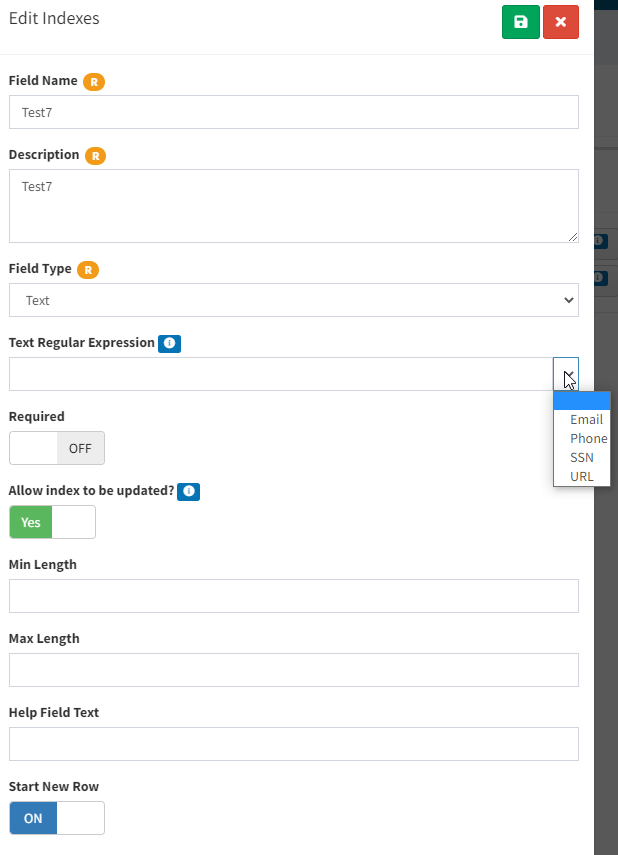
- Field Name: The name of the field that will be displayed to the end user. This should be short but descriptive as to the data to be captured in this field.
- Description: a more detailed description of what this field will capture, but only viewable in this admin screen.
- Field Type: What type of data will be captured in this field? Selecting the correct type from the list will force automatic system validation at the time of data entry by the user.
- Currency: Must be a US dollar amount with 2 decimal places
- Date: Must be a date formatted in MM/DD/YYYY format.
- Memo: Same as Text, but with a larger input area. Allows for multiple lines of text.
- Numeric: Must be a whole number that contains no decimals.
- Option List: A list of predefined options will be displayed to the end user at time of indexing/form entry.
- If this option is selected, an additional field will appear to enter the option list items that will be included.
- Press ENTER between each option entered into this field.
- If this option is selected, an additional field will appear to enter the option list items that will be included.
- Text: Allowed to contain any type of text, numeric or special character values.
- Text Regular Expression (Optional): If Text is selected, this option is available. Use the predefined options from the list to have the system automatically validate the specific input mask for that type of data being entered.
- A custom expression (entered manually) can be entered in this box, but please consult with the IWS system administration team prior to attempting a custom expression.
- Text Regular Expression (Optional): If Text is selected, this option is available. Use the predefined options from the list to have the system automatically validate the specific input mask for that type of data being entered.
- Required: This field must be filled out at the time of indexing/form entry. The field is "required".
- Allow Index To Be Updated: Default is YES. If set to NO, this index/form field will not allow any user to update the field content after the initial indexing phase. (Added v7.0.0)
- This can be used to keep certain form/index fields from being changed later in the workflow process.
- Min Length (Optional): When data is entered into this field, it must be at least the number of characters specified here.
- Max Length (Optional): When data is entered into this field, it must be at maximum the number of characters specified here.
- Help Field Text (Optional): Text entered here will display to the end user as additional assistance in understanding what needs to be entered into this index/form field.
- Start New Row (Optional): If selected as ON, the system will start a new row on the display of the index/form fields after this field. If selected as OFF, the system will not start a new row after this field, and will display the next index/form field on the same line of the screen until maximum screen width is reached, and then a new row will be started.
- **Most indexing related fields have this set to ON so they display one after another in a single column display on the indexing screen. Forms and form fields can be set to make the form display across and down as needed.
Security (Tab)
The Security section allows us to assign which department users and/or security groups can access this document type in the system.
IWS has a multi-level security structure to provide robust access options to each department. Not only does the user need to have access to the IWS system, they must also be granted access to the specific Department. Once in a department, the user must have access to each document allowed document type to be able to view that document type in any area of the department. Queue level security is also present for workflow processors and is assigned on a queue by queue basis just like the document types. See the Department Admin - User Security section for a more robust way to assign Document Types, Queues and Security Groups to end users.
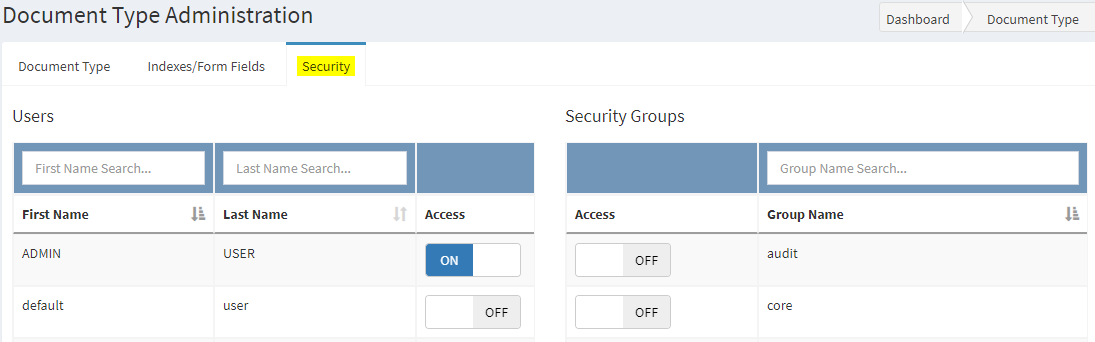
Users
- This section will display all department users.
- Select the toggle in the "Access" column to grant access to this document type to the appropriate users.
- The search/filter boxes above each column can be used to find a specific user in the list.
- Each column can be sorted by clicking on the column header. Click the header multiple times to change the sort order.
Security Groups (Optional)
- This section will display all department security groups. End users are assigned to specific security groups (see Department Admin - User Security) to be able to access certain areas of the department. Granting a security group with access to this document type will allow ALL users within that security group to access this document type.
- Select the toggle in the "Access" column to grant access to this document type to the appropriate security groups.
- The search/filter boxes above each column can be used to find a specific group in the list.
- Each column can be sorted by clicking on the column header. Click the header multiple times to change the sort order.
Retention Rules (Tab)
Added in version 9.0.0
The Retention Rules section allows us to assign document type specific retention rules that will either DELETE or MOVE documents over a specified age.
Retention rules MUST be activated on the main Document Type tab before any retention rules or policies will be enforced for any document type.
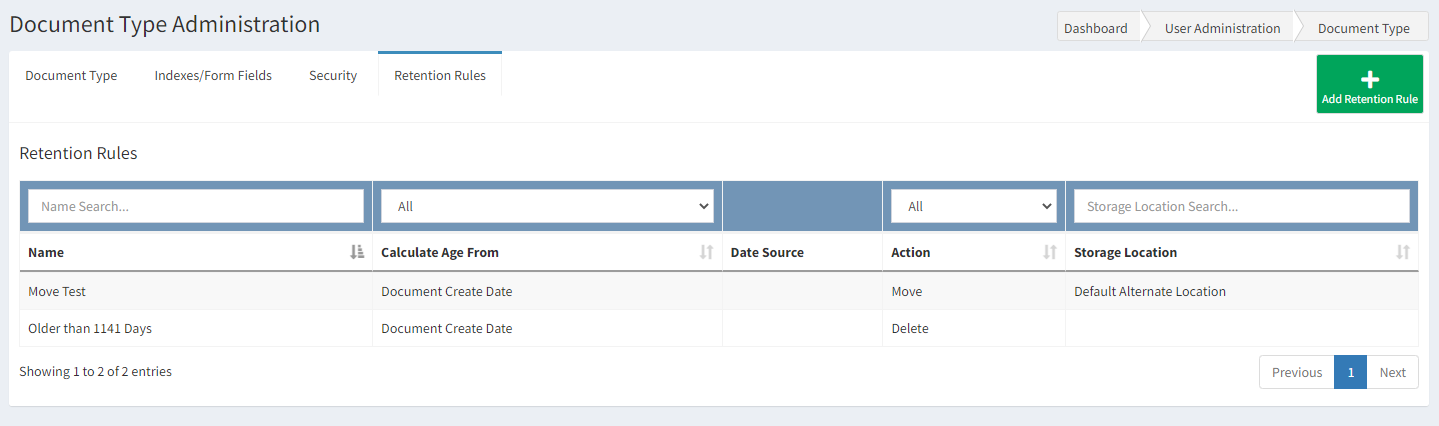
Retention Rules Search/List
Use the list to find and edit an existing retention rule. Use the Add Retention Rule button to create a rule for this document type.
- Use the search/filter boxes at the top of the grid to narrow the list of Retention Rules.
- The column headers can be clicked to sort each column. Click again to sort the opposite direction.
- Click on any Retention Rule record to open the edit screen.
Retention Rules Add/Edit
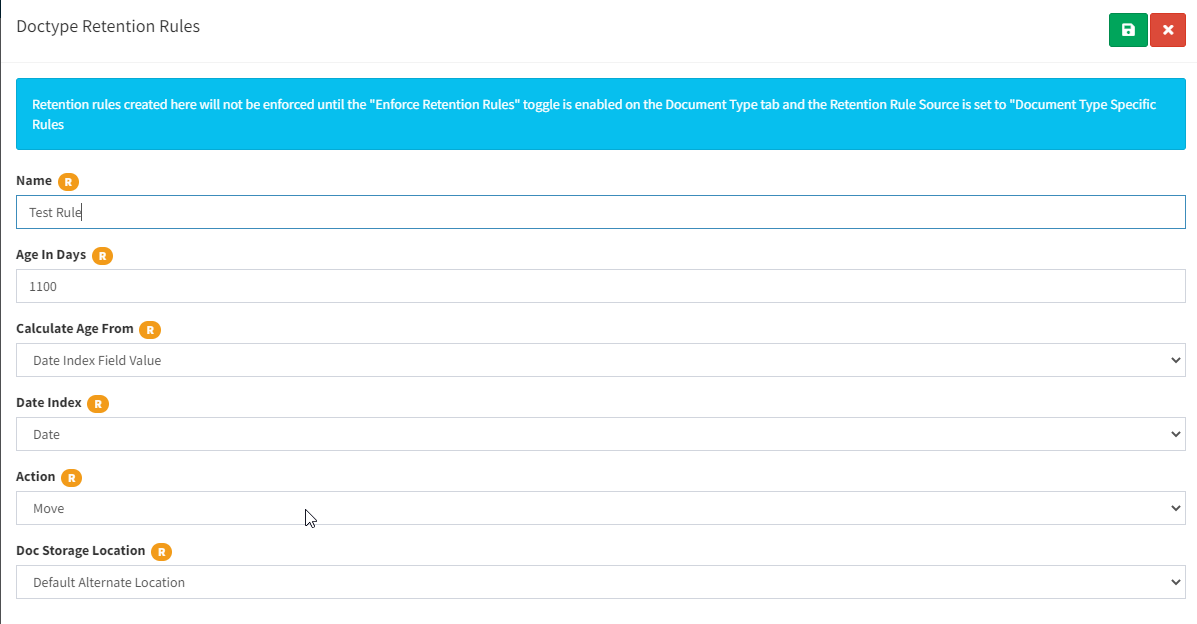
- Name: The name of the rule for reference on the list screen. This should be short but descriptive as to what retention options this rule includes.
- Age In Days: The age (in days) that the documents need be older than for this rule to apply.
- Example: 2,555 days will cause a rule to perform the selected action on documents 7 years or older.
- Calculate Age From: This selection determines if the Age In Days (specified above) should be calculated from the following two options:
- Document Create Date: The date the document was created in IWS.
- Date Index Field Value: A date field located in the index of this document type.
- Date Index: Select the document Index field that is to be used for the age calculation.
- IF the Calculate Age From field has the Date Index Field Value option selected, this filed will be available. Otherwise, it will be disabled.
- Action: What retention action should the system perform for this rule?
- MOVE: After the age is reached, the documents will be moved to a secondary storage location (selected in the Doc Storage Location field).
- This option will require a secondary document storage location to be setup by HealthSmart System Administrators and IWS System Administrators.
- DELETE: After the age is reached, the documents will be completely deleted from the IWS system and the storage drive.
- A rule with this option should be setup for all document types that do not require permanent retention. 7 years, 10 years, etc. should be configured so HealthSmart can maintain fast and expensive disk storage space for current documents. Consult your department director for the proper retention period.
- **There is no recovery from this option. Once documents are deleted, they cannot be restored.
- MOVE: After the age is reached, the documents will be moved to a secondary storage location (selected in the Doc Storage Location field).
- Doc Storage Location: If the Action option is set to MOVE, where should the documents be moved once age is reached.
- Only predefined alternative storage locations will appear in this list.
Action Buttons
- Save: Saves any changes you have made to the record.
- Close: Closes the record (without saving changes) and returns to the list.
Related Pages
There is no content with the specified labels